End leases and eject accounts
Enable maintenance mode
Maintenance mode allows Admins to perform sensitive maintenance work like setup, troubleshooting, upgrading, or teardown of the solution. When you enable maintenance mode, it will stop users and managers from making API requests to the solution, and any new API requests will not interfere with maintenance tasks being performed by the Admin.
To enable maintenance mode:
-
Log in to the AWS account where the Sandbox Studio Hub and data stacks are deployed, and select the correct home Region.
-
Navigate to AWS AppConfig and from the left pane, select Applications.
-
On the Applications page, select InnovationSandboxData-Config-Application-XXXXXXX. The Application details display.
-
Under Configuration Profiles and Feature Flags, select InnovationSandboxData-Config-GlobalConfigHostedConfiguration-XXXXX configuration profile, and choose Create.
-
Update the maintenanceMode value to
true.
...
Put the solution into maintenance mode maintenance
Mode: true
...-
Select Create hosted configuration version.
-
Select Start Deployment, and choose the latest hosted configuration version you just created.
-
Choose Start Deployment.
This will set the account to Maintenance mode.
End all Active and Locked Leases
In this step, you will terminate all active and frozen leases to stop incurring costs for these accounts.
-
Log in to the web UI as an Administrator.
-
From the left pane, select Manage Leases.
-
On the Manage Leases page, under Filter Leases options, for status, filter for all Active and Locked leases if not already selected by default.
-
Under the Leases section, select all the leases matching the filter criteria.
-
From the Actions dropdown, select Terminate Lease.
Note: If there are multiple pages of leases, repeat this for all leases that match the Active and Locked filters.
This will terminate the leases and submit the accounts for clean-up. Depending on the number of accounts, clean-up may take a few minutes.
Eject accounts
In this step, you will manually eject accounts that have been cleaned up, and are available for reuse.
-
Log in to the web UI as an Administrator.
-
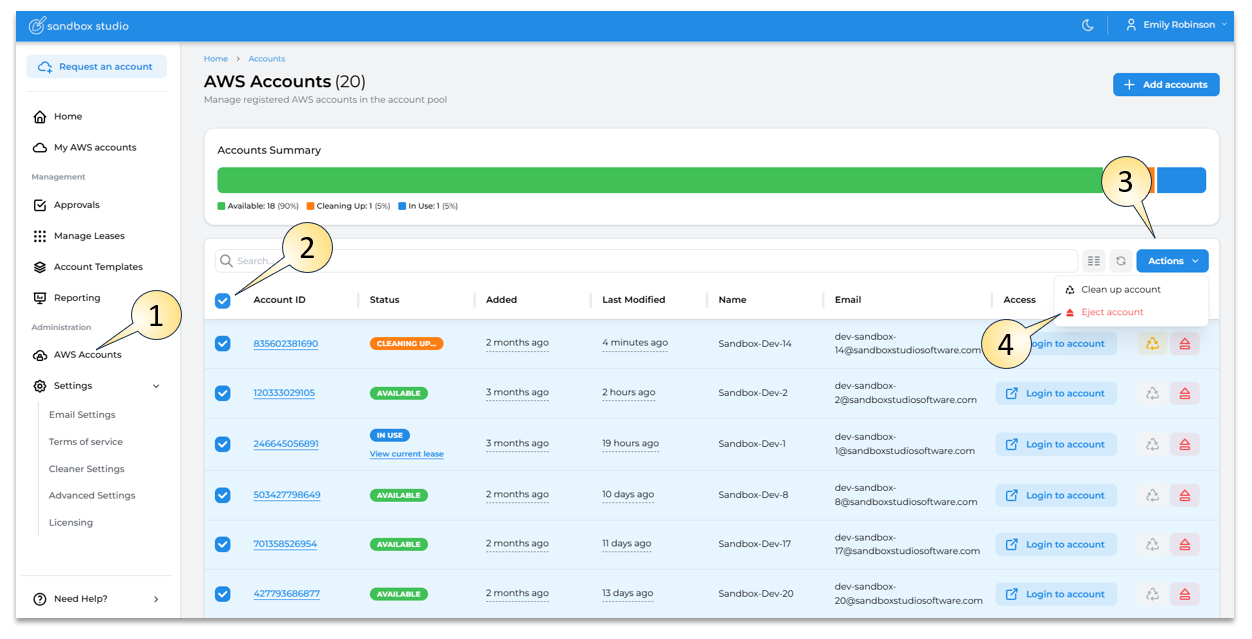
From the left pane, select Administration > AWS Accounts. The Accounts page displays all the accounts currently in the account pool.
-
Search for, and select all the accounts you want to eject from the account pool. You can eject any accounts from the account pool, except those in the Clean up state. (In SBS you can Eject an account in Clean up state??)
Note: If a clean-up failed on an account, that account will be moved to a Quarantine state. After you troubleshoot these accounts, you can manually clean-up accounts in Quarantine. Accounts in Quarantine will continue to incur cost, so make sure you manually troubleshoot these accounts before attempting to eject these accounts.
-
From the Actions dropdown, select Eject account.
-
On the confirmation dialog, select Submit to confirm.
Note: If there are multiple pages for accounts, repeat this for all accounts you want to eject.
This will eject the accounts from the Account pool.
Move accounts out of the Organizational Unit
In this step, you will move accounts out of the Organization Unit so that the StackSet can delete all the stack instances from the sandbox account.
-
Log in to the Organization Management account, and navigate to AWS Organizations.
-
From the left pane, select AWS Accounts.
-
From the organization structure tree, select the Sandbox Studio OU, named <NAMESPACE>_InnovationSandboxAccountPool. For example, myisb_InnovationSandboxAccountPool.
-
Confirm that there are no other accounts in the OUs other than the Exit or Entry OUs. If there are accounts in other Account Pool OUs, eject these accounts using steps described in the above Eject accounts section.
-
Move the accounts in Exit to outside the Sandbox Studio OU, or the root OU.
This will ensure that there are no accounts in the OU before you uninstall the stacks for the solution.
No comments to display
No comments to display